How to make a table in React with Hooks

We all have worked with tables in HTML and styled them using CSS or any of its frameworks or preprocessors. But today we will be seeing how to make a table in React with JSX and hooks, and style it with Bootstrap and Vanilla CSS for making it responsive.
Tables are used in almost every operation which is done online either to display data to others like financial reports, sports leaderboards, and pricing and comparison pages or just to keep a record of some things.
In this blog, we will make a table in React using hooks which can perform multiple operations like add, delete, edit and sort data not only alphabetically but numerically as well.
There are npm packages that can be used for making a table on React. Making one with an npm package may be the easiest way out but will also consume space which sometimes can give us the shorter end of the straw.
Let’s begin…
Index
- Getting Started
- Creating the App – React Table
- Working on the UI part of the App
- Using useState hook for defining and managing states
- Making the form for adding a new row
- Working on functionalities
- Deleting a Row
- Editing a Row
- Saving the Edited Row
- Sorting the Table Alphabetically
Getting Started
In this blog, we will mostly be using bootstrap for styling our App, and Vanilla CSS will only be used for making it responsive.
We will not discuss the styling part of the app as our focus will be only on the React part of the App.
We have made dummy data for our app which consists of six sections – FullName, UserName, EmailID, etc, all in one file which will be called dynamically in the app.
export const data = [
  {
    id: 1,
    fullName: "Leanne Graham",
    userName: "Bret",
    email: "Sincere@april.biz",
    phoneNumber: "1-770-736-8031 x56442",
    website: "hildegard.org",
    companyName: "Romaguera-Crona",
  },
  {
    id: 2,
    fullName: "Ervin Howell",
    userName: "Antonette",
    email: "Shanna@melissa.tv",
    phoneNumber: "010-692-6593 x09125",
    website: "anastasia.net",
    companyName: "Deckow-Crist",
  },
  {
    id: 3,
    fullName: "Clementine Bauch",
    userName: "Samantha",
    email: "Nathan@yesenia.net",
    phoneNumber: "1-463-123-4447",
    website: "ramiro.info",
    companyName: "Romaguera-Jacobson",
  },
  {
    id: 4,
    fullName: "Patricia Lebsack",
    userName: "Karianne",
    email: "Julianne.OConner@kory.org",
    phoneNumber: "493-170-9623 x156",
    website: "kale.biz",
    companyName: "Robel-Corkery",
  },
  {
    id: 5,
    fullName: "Chelsey Dietrich",
    userName: "Kamren",
    email: "Lucio_Hettinger@annie.ca",
    phoneNumber: "(254)954-1289",
    website: "demarco.info",
    companyName: "Keebler LLC",
  },
  {
    id: 6,
    fullName: "Mrs. Dennis Schulist",
    userName: "Leopoldo_Corkery",
    email: "Karley_Dach@jasper.info",
    phoneNumber: "1-477-935-8478 x6430",
    website: "ola.org",
    companyName: "Considine-Lockman",
  },
  {
    id: 7,
    fullName: "Kurtis Weissnat",
    userName: "Elwyn.Skiles",
    email: "Telly.Hoeger@billy.biz",
    phoneNumber: "210.067.6132",
    website: "elvis.io",
    companyName: "Johns Group",
  },
  {
    id: 8,
    fullName: "Nicholas Runolfsdottir V",
    userName: "Maxime_Nienow",
    email: "Sherwood@rosamond.me",
    phoneNumber: "586.493.6943 x140",
    website: "jacynthe.com",
    companyName: "Abernathy Group",
  },
  {
    id: 9,
    fullName: "Glenna Reichert",
    userName: "Delphine",
    email: "Chaim_McDermott@dana.io",
    phoneNumber: "(775)976-6794 x41206",
    website: "conrad.com",
    companyName: "Yosting Mantra",
  },
  {
    id: 10,
    fullName: "Clementina DuBuque",
    userName: "Moriah.Stanton",
    email: "Rey.Padberg@karina.biz",
    phoneNumber: "024-648-3804",
    website: "ambrose.net",
    companyName: "Hoeger LLC",
  },
];
As shown, the data is in JSON format with an array containing different key and value pairs and is named as data.js.
In this table, we will see functionalities like –
- Adding an extra row.
- Deleting a particular row.
- Editing a row.
- Sorting the table alphabetically in both ascending and descending order.
You can see the table in action by clicking here and giving it a like on GitHub.
Creating the App – table-in-react
It’s easy to create a React App – just go to your working directory in any of your preferred IDEs and enter the following command in the terminal:
npx create-react-app table-app-react
If you are unsure how to properly set up a create-react-app project you can refer to the official guide here at create-react-app-dev.
After the setup, run npm start in the same terminal to start the localhost:3000 where our React app will be hosted. We can also see all our changes there.
Working on the UI part of the app
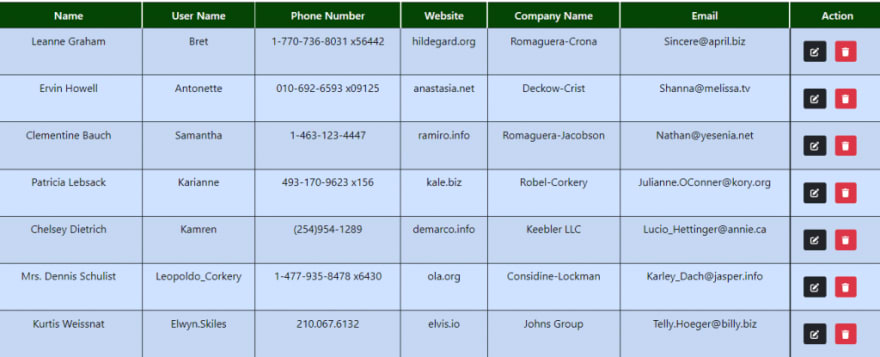
The UI part is simple. We have to create a table using the HTML table tag along with thead, tbody, tr, and td.
We will get details from the dummy data dynamically by importing it into our App.js Component and displaying it using the map function.
import React, { useState } from "react";
import { data } from "./Data";
const App = () => {
  return (
    <>
      <div className="container-fluid">
        <div className="row pt-5">
          <form>
            <table className="table table-striped table-primary table-hover text-center fs-5 table-bordered border-dark">
              <thead>
                <tr>
                  <th id="tr" onClick={() => Sort("fullName")}>
                    Name
                  </th>
                  <th id="tr" onClick={() => Sort("userName")}>
                    User Name
                  </th>
                  <th id="tr" onClick={() => Sort("phoneNumber")}>
                    Phone Number
                  </th>
                  <th id="tr" onClick={() => Sort("website")}>
                    Website
                  </th>
                  <th id="tr" onClick={() => Sort("companyName")}>
                    Company Name
                  </th>
                  <th id="tr" onClick={() => Sort("email")}>
                    Email
                  </th>
                  <th id="tr">Action</th>
                </tr>
              </thead>
              <tbody>
                {data.map((data) => {
                  return (
                    <>
                      <tr>
                        <td>{data.fullName}</td>
                        <td>{data.userName}</td>
                        <td>{data.phoneNumber}</td>
                        <td>{data.website}</td>
                        <td>{data.companyName}</td>
                        <td>{data.email}</td>
                        <td className="d-flex p-4">
                          <button
                            className="btn btn-dark me-3"
                            onClick={() => Edit(data)}
                          >
                            <i class="fa-solid fa-pen-to-square"></i>
                          </button>
                          <button
                            className="btn btn-danger"
                            onClick={() => Delete(data.id)}
                          >
                            <i class="fa-solid fa-trash"></i>
                          </button>
                        </td>
                      </tr>
                    </>
                  );
                })}
              </tbody>
            </table>
          </form>
        </div>
      </div>
    </>
  );
};

export default App;
In the above code, we can see two buttons with onClick event handlers. They will be responsible for both editing and deleting their respective rows.
You can read the full article here.
