Automate daily Tweets with Postman and the Twitter API v2 🌞

Has your Twitter feed been blowing up with "gm's" lately?
If you're not in the know, this is crypto speak for "good morning", and is a customary way web3 and crypto nerds clock in for the day.
Do you always forget to gm? Do you not care but want to give the illusion you're hip and GMI? Use Postman monitors with the Twitter API v2 to automate posting your daily salute to Twitter.
1. Get a Twitter Developer account
On top of a normal Twitter account, you will need to set up a free Twitter developer account here.
Make a hobbyist account and explain that you will use your account to post your own tweets. Part of your on-boarding will be to "create a project".
2. Create an App
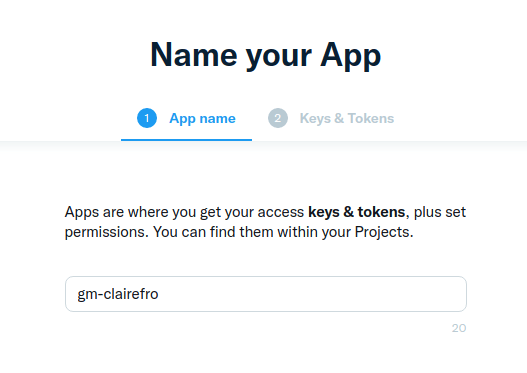
Once you have your developer account and project set up in your Twitter developer dashboard, you need to add an App to your project in order to use the API.
Give your new app a name
3. Get your secrets
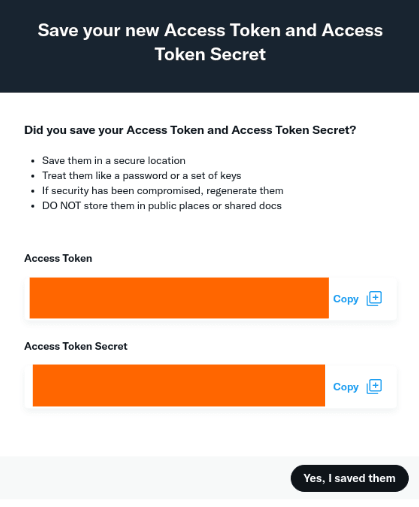
Next you will be given some secrets. Treat these credentials like passwords and store them somewhere secure. The keys are hidden in this image, but you'll see something like this:
4. Give your app read and write permissions
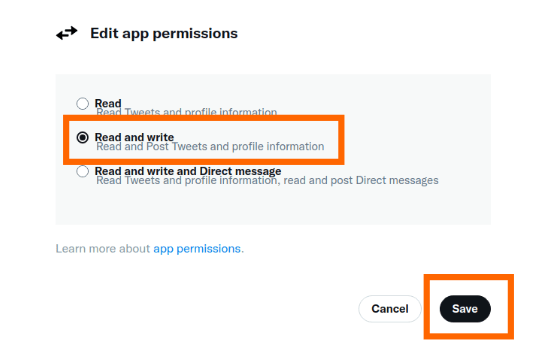
You need to enable your app to post tweets on your behalf. Go to your app's "Settings" tab and click the button to edit the App permissions.
Update the app permissions from "Read" to "Read and write". Click save to apply the changes.
5. Generate additional credentials
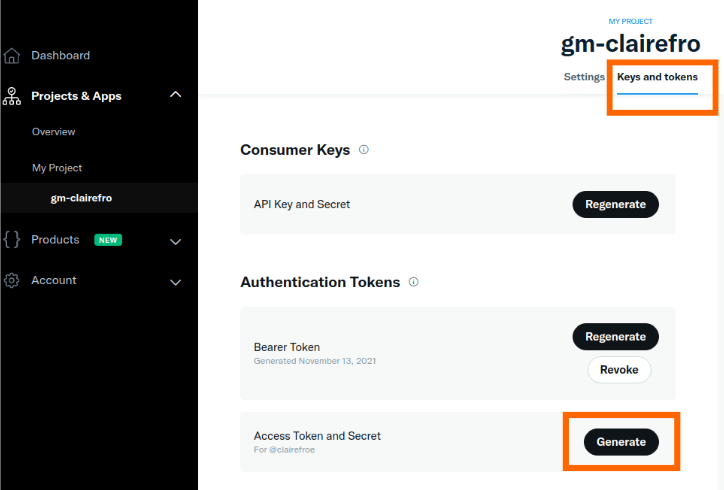
You will also need to securely jot down an Access Token and Access Token Secret, which can be generated in your app's "Keys and tokens" tab.
Copy the generated token and token secret with your other secrets. These are the final credentials we need to authorize requests to the Twitter API.
6. Log in to Postman
Postman is a free tool for building, consuming, testing, documenting, and monitoring APIs. You can create a free account here.
Once you have an account you can access the tool from the browser without downloading anything, simply by going to https://postman.com
7. Create a personal workspace
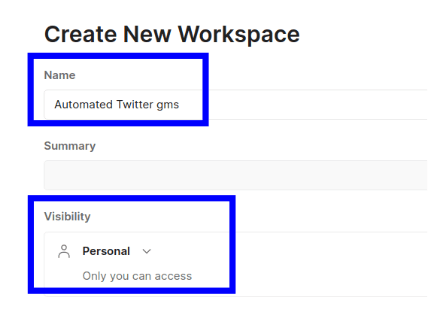
To make API requests in Postman, first you need a workspace. You can create a workspace from the "Workspaces" dropdown.
IMPORTANT: The workspace visibility should be set to Personal, since we will be storing our secret keys in a way that would make them visible if the workspace were public.
8. Create a collection
In Postman, API requests live inside Collections.
Create a collection either with the "Create a collection" button, or the plus "+" icon in the collections tab. Name your collection Twitter API v2
9. Add a request to post Tweets
Now we can build a request to the Twitter API that will post a tweet on your behalf. First, "Add a request", and name it post a tweet
Using the Twitter API v2
We will use this endpoint in the Twitter API v2 to tweet:
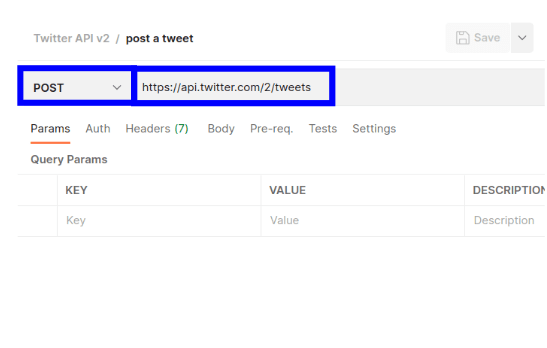
POST https://api.twitter.com/2/tweets
You can read more about it here in the docs.
Paste this endpoint into the request URL in Postman, and set the request method to POST.
Add a body to your request
The Twitter API v2 expects a JSON body, where a text property is the text content of your tweet.
In the "Body" tab of your request in Postman, select "raw" > "JSON" as the datatype and paste this JSON data in the body:
{
  "text": "gm"
}
Authorize your request
You can't just go tweeting as anybody. In order to tweet you will need to authorize your request with your credentials.
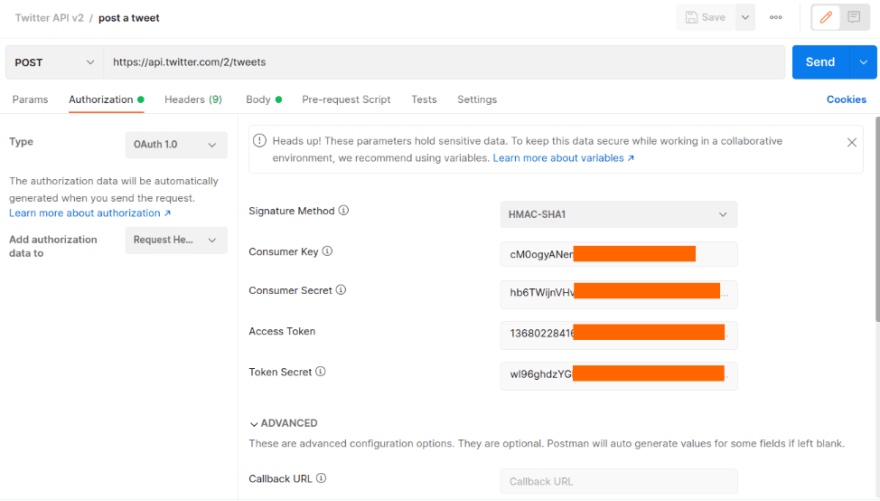
This endpoint accepts OAuth 1.0 authorization. We can use Postman's "Authorization" tab on the request to set this up. Select OAuth 1.0 as the Authorization type.
First, make sure the request is set up to add the authorization data to the "Request Headers":
On the right, we will enter our Twitter app credentials: API Key, API Key Secret, Access Token, and Access Token Secret for the fields Consumer Key, Consumer Secret, Access Token, Token Secret, respectively. Leave everything else as the default.
NOTE: Usually you do not want to hard code sensitive data like this directly in the Authorization tab.
Normally you should use variables to obscure your secrets. Variables defined only in the "Initial Value" column are local to your Postman app and won't be shared.
However, in order to automate our tweets in a later step we need the secrets to be accessible by Postman servers in your workspace. Be sure not to make your workspace public or people could steal your API credentials and tweet abuse your Twitter.
Save all your changes and send the request. In Postman you should get a status 201 response from the Twitter API with the id of your new Tweet. Go check out Twitter!
10. Automate daily tweets in Postman
Postman allows you to create monitors that run your collections at specified intervals to alert you when your servers have caught on fire.
This feature can double as a way to schedule cron jobs for running API calls, which is exactly what we'll do to run our post a tweet request every morning.
Set up a Postman monitor
In the same personal workspace you made, click the "Monitors" tab on the far left menu, then "Create a Monitor".
Give your monitor a name. Select the collection you made and configure it to run every morning. Set it to a bright and early time to make yourself appear industrious ☕.
Scroll down and click the big orange "Create Monitor" button to set up the scheduled run. Give your monitor a test run by clicking the "Run" button manually - check your Twitter and make sure it works.
Congratulations! Sit back and let the robots take over.
BONUS: Add random emojis for humanizing effect
If you want to further hide the sham that you have a bot tweeting your gms, add a personalized random emoji to each tweet using scripts in Postman.
Add a pre-request script to get a random emoji
Head back to the Collections tab in your workspace and click on the post a tweet request.
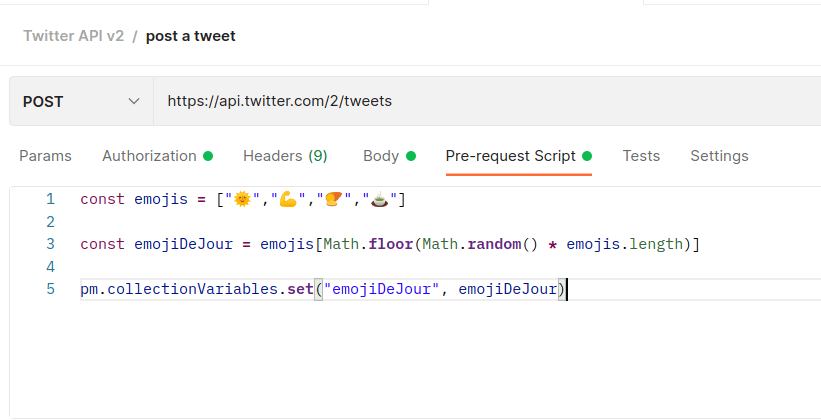
Open the "Pre-request Scripts" tab on the request. Any Node.js code we write in here will be executed right before our request is sent off. Paste in this code, but use any custom emojis that suit your personality:
const emojis = ["🌞","💪","🍠","🍵"]

const emojiDeJour = emojis[Math.floor(Math.random() * emojis.length)]

pm.collectionVariables.set("emojiDeJour", emojiDeJour)
To explain, first we are defining an array of emojis. Then we select a random emoji and assign it to the local variable emojiDeJour. Finally we use Postman's pm helper object to programmatically set our emojiDeJour as a collection variable of the same name. This will allow us to access the emojiDeJour in the body of our request.
Add the emoji to our tweet in the request body
Finally, interpolate the emojiDeJour from the collection variables using Postman's {{variable}} syntax with double curly braces. Update the request body to:
{
    "text": "gm {{emojiDeJour}}"
}
Save your changes! Now each time request is sent you get a random emoji at the end of your tweet. I got sweet potato.
Conclusion
Postman monitors are a simple and free way to run scheduled API calls, making it easy to automate tweets using the Twitter API. Twitter has a fabulous API for interacting with the app, just take care your use case is not prohibited before making automations. Also note that the Twitter API is rate limited and you should make no more than 200 tweets via the API in a 15 minute window. But if you tweet that much you will have lost all your followers anyway.
You can see a completed example of the Postman workspace here (just make sure YOU make a personal workspace)
gn 🌚
Disclaimer: I work for Postman, but the thoughts and promotion of gm culture in this article are my own.


