Using Huawei App Messaging in Android
Huawei AppGallery Connect's App Messaging service allows you to send targeted, useful in app messages to your users.
The look and content of messages are completely customisable, and there is a wide range of triggers and filters that can be used to decide who will receive a message and when.
Lets take a look today at how we can set this up to work within an Android project.
As always we will start with a fresh project but of course you can just as easily use this guide to build the service into an app you already have!
Enabling the Service
Sign in to AppGallery Connect, click My projects, click your project, go to Grow > App Messaging, and click Use now. For more information, please refer to App Messaging.
If you do not have an Android project, create one first.
After completing these steps, you can start creating an in-app message.
Click New in the upper right corner.

Set the style and content and click Next.

Select a message type from the Layout drop-down list, and set its style and content. Currently, the Modal, Image, and Banner message types are supported.

Set target users and click Next.
In App, select the name of the app package for which you need to publish the in-app message.
You can click New condition to add a condition for matching target users, which include app version, OS version, language, country/region, audience, and more. Among the types, User attributes are defined under HUAWEI Analytics > Management > User attributes, and Prediction is defined by creating prediction tasks under My projects > Grow > Prediction.

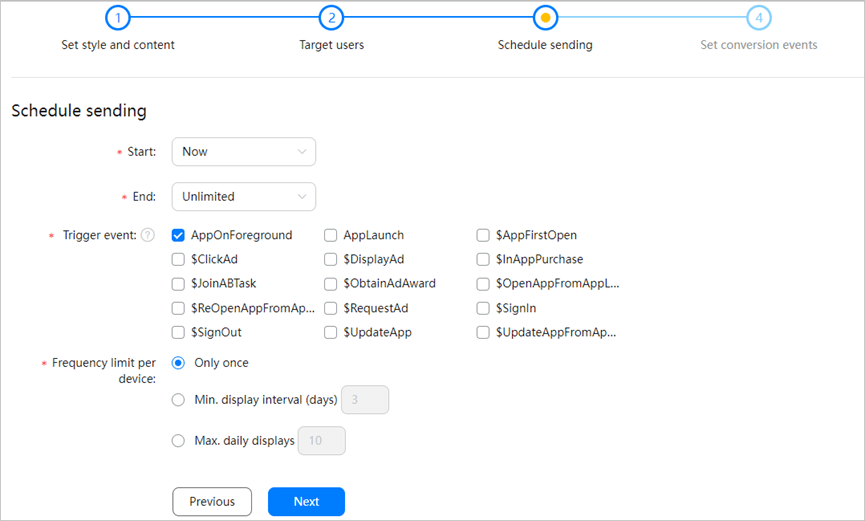
Set the message sending time

Message display is triggered by specific events. App Messaging supports two types of trigger events: preset events and HUAWEI Analytics events.
(Optional) Set conversion events. Before setting a conversion event, you need to toggle it on first, which can be done as follows:
Go to HUAWEI Analytics > Management > Events and toggle Mark as conversion event and Event switch on for the specified event. In addition to the events the SDK collects, you can also create a preset or custom event for event tracking and analysis.
Finally, Click Save or Publish.
Integrating the Service SDK
Add Maven repository configuration to the build.gradle file of your project.
Open the app-level build.gradle file and configure the App Messaging SDK
In AppGallery Connect, click My projects, and find your project from the list. Go to Project settings > General information, download the agconnect-services.json file, and save the file to the app directory of your Android project.
Displaying an In-App Message
If you choose to display a message using the default message layout, the development process is totally coding-free.
By integrating the SDK as above you are all good to go, your creating message will be displayed as per its filters and triggers.
You can also call APIs provided by the service SDK to customize your in-app message.
Customising the Message Layout
First, you need to customize a message display class. To do so, implement AGConnectAppMessagingDisplay and override the displayMessage method.
Define an AlertDialog in displayMessage and copy the layout file to the code. The sample code is as follows:
Call addCustomView to implement the custom layout.
Test in app message
Obtain the Anonymous Application Identifier (AAID) of your test device, which is used to identify app instances running on mobile devices during app installation. Compared with device-level hardware IDs that cannot be reset, the privacy of AAID is much higher. We can obtain the AAID through coding.
Sign in to AppGallery Connect, go to Grow > App Messaging > Messages, find the message that you need to test, and click Test in the Operation column.
Click Add test user and enter the AAID in the test box.
Click Save. Check whether the test message can be properly displayed and operated.
For details, please refer to the development guide of App Messaging.


