Serverless blog with 11ty, GraphCMS and Firebase
The idea behind this experiment was to ignore modern practices: no Vercel and the complete React ecosystem. Back to basics and back to the roots of the interwebs with a static blog that's just html and some minimal css.
So I picked 11ty (as I'm very fond of it) and Firebase Hosting, since that is basically the equivalent of a public dropbox folder. The content should be managed apart from the code though, as I don't want my blog to be managed from VS Code and Git.
In comes GraphCMS, a competitor of the beloved DatoCMS. It lacks some features - like repeatable blocks and the UI is a bit too cluttered, but has a generous free tier. For a blog, this will do just fine.
The CMS
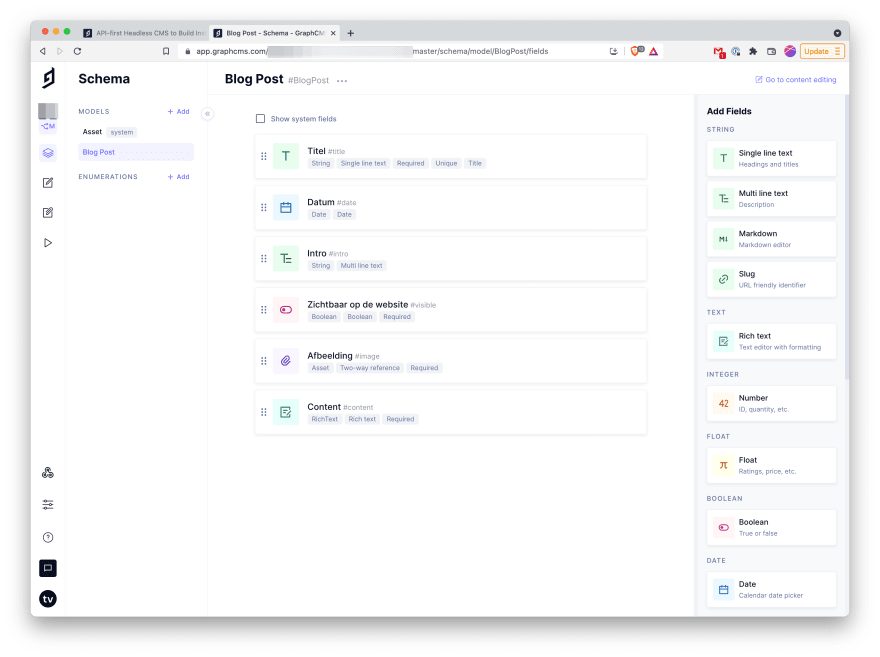
With GraphCMS, you just "click" your data models together. They provide a GrahpQL playground with all use cases predefined for your data models and queries.
Now it's just populating the posts in the content tab!
The website itself
The code itself is nothing fancy. There are only 2 pages and 1 data file. As you can see, there aren't a lot of CSS classes, as I'm using pico.css underneath.
The homepage will show the latest 10 posts, and will generate some pagination if there's a need to.
# src/index.liquid
---
layout: base
pagination:
  data: posts
  size: 10
permalink: '{% if pagination.pageNumber == 0 %}index.html{% else %}{{ pagination.pageNumber|plus:1 }}/index.html{% endif %}'
---

<header class="container pb-0">
  <hgroup>
    <h1>Title of your blog</h1>
    <h2>Some subtitle for your blog.</h2>
  </hgroup>
</header>

<section class="container">
  {% for post in pagination.items %}
  <article class="article--home">
    <div class="article__content">
      <hgroup>
        <h3>{{ post.title }}</h3>
        <h4>{{ post.date }}</h4>
      </hgroup>
      <p>
        {{ post.intro }}
      </p>
      <a href="/post/{{ post.id }}" role="button">Verder lezen</a>
    </div>

    {% if post.image %}
    <div
      class="article__img"
      style="
        background-image: url('{{ post.image.url }}');
      "
    ></div>
    {% endif %}
  </article>
  {% endfor %}
</section>

{% if pagination.hrefs.length > 1 %}
<section class="container pagination">
  <nav>
    <ul>
      {% for link in pagination.hrefs %}
      <li>
        <a href="{{ link }}" class="{% if page.url == link %}secondary{% endif %}">
          {% if link[1] %}{{ link[1] }}{% else %}1{% endif %}
        </a>
      </li>
      {% endfor %}
    </ul>
  </nav>
</section>
{% endif %}
A blog detailpage will look like this
# src/_post.liquid
---
layout: base
pagination:
data: posts
size: 1
alias: post
reverse: true
permalink: 'post/{{post.id}}/'
---
<main class="container">
<hgroup>
<h1>{{ post.title }}</h1>
<h2>{{ post.date }}</h2>
</hgroup>
{% if post.image %}
<figure>
<img src="{{ post.image.url }}" alt="{{ post.title }}" />
</figure>
{% endif %}
{{ post.content.html }}
</main>
<section class="container post-nav">
{% if pagination.nextPageHref %}
<a href="{{ pagination.nextPageHref }}" class="secondary" role="button">←</a>
{% else %}
<span></span>
{% endif %}
{% if pagination.previousPageHref %}
<a href="{{ pagination.previousPageHref }}" class="secondary" role="button">→</a>
{% else %}
<span></span>
{% endif %}
</section>
Then, where does this data come from? Well from a data file that fetches the data from GraphCMS. It's located under src/_data.
# src/_data/posts.js
module.exports = async () => {
  const { GraphQLClient, gql } = require('graphql-request');

  const authToken = 'YOUR_GRAPHCMS_AUTH_TOKEN';
  const endPoint = 'https://api-eu-central-1.graphcms.com/v2/YOUR_GRAPHCMS_PROJECT_ID/master';
  const client = new GraphQLClient(endPoint, {
    headers: {
      authorization: `Bearer ${authToken}`,
    },
  });

  const query = gql`
    query BlogPosts {
      blogPosts(orderBy: date_DESC, where: { visible: true }) {
        createdAt
        visible
        intro
        title
        date
        id
        content {
          html
        }
        image {
          url
        }
      }
    }
  `;

  const { blogPosts } = await client.request(query);

  return blogPosts.map((p) => {
    const date = new Date(p.date);
    p.date = date.toLocaleDateString('nl', { year: 'numeric', month: 'long', day: 'numeric' });

    return p;
  });
};
The code above will return all your posts. 11ty is smart enough to convert it into paginated overview pages and to generate a seperate detail page for each blog post.
Bringing it live
With Firebase, deploying a build of a website is easy as 1-2-3.
Just install firebase in your project and configure your build and deploy script in package.json.
Firebase
Installing and configuring Firebase is done with an npm package.
$ npx firebase init
You should only select hosting when prompted. Create a new project, or use one you already have.
Your firebase.json should look like this.
{
  "hosting": {
    "public": "_site",
    "cleanUrls": true,
    "ignore": ["firebase.json", "**/.*", "**/node_modules/**"],
  },
}
In .firebaserc you will see your configured Firebase project.
package.json
  "scripts": {
    "watch:eleventy": "npx @11ty/eleventy --serve",
    "watch:sass": "npx sass src/_scss:_site/css --watch",
    "dev": "export $(cat .env | xargs) && npm run watch:eleventy & npm run watch:sass",
    "build": "export ELEVENTY_ENV=prod && rm -rf _site && npx sass src/_scss:_site/css --no-source-map && npm run postcss && npx @11ty/eleventy",
    "release": "standard-version",
    "postcss": "postcss _site/css/app.css -o _site/css/app.css --use autoprefixer -b 'last 2 versions' | postcss _site/css/app.css -o _site/css/app.css --use cssnano"
  },
From here, it's only executing these commands to deploy your GraphCMS-powered blog.
$ npm run build && npx firebase deploy --only hosting
Et voila, your blog is live.
Automating deployments
Now, we should configure a webhook in GraphCMS that triggers the manual process of building and deploying the new package to Firebase.
Firebase doesn't build our package, so we'll have to resort to some CI/CD solution. GitHub Actions to the rescue!
With this "workflow" you can trigger an automatic build and deploy to Firebase on pushes on the main branch.
{% raw %}
name: Deploy to Firebase
on:
  workflow_dispatch:
  push:
    branches:
      - main
jobs:
  build_and_deploy:
    runs-on: ubuntu-latest
    steps:
      - uses: actions/checkout@v2
      - run: npm ci && npm run build
      - uses: FirebaseExtended/action-hosting-deploy@v0
        with:
          repoToken: '${{ secrets.GITHUB_TOKEN }}'
          firebaseServiceAccount: '${{ secrets.FIREBASE_SERVICE_ACCOUNT }}'
          channelId: live
          projectId: YOUR_FIREBASE_PROJECT_ID
{% endraw %}
The FIREBASE_SERVICE_ACCOUNT secret is one that you should generate locally and store in GitHub Secrets within your repo.
You can generate one in the Firebase console on
https://console.firebase.google.com/project/
YOUR_FIREBASE_PROJECT_ID/settings/serviceaccounts/adminsdk
Now pushing to the repo on the main branch, triggers a new build and deploy through GitHub Actions.
But, and this one is not so fun, GitHub doesn't provide a webhook that triggers that same action, so you'll have to provide one yourself, by building a Cloud Function.
$ npx firebase init functions
$ cd ./functions && npm install
In your freshly generated ./functions/src/index.ts add this code, that accept only HTTP call to the endpoint and will trigger a GitHub trigger of your main.yaml workflow.
import * as functions from 'firebase-functions';
import fetch from 'node-fetch';

export const handler = functions.https.onRequest(async (request, response) => {
  const { status } = await fetch(
    'https://api.github.com/repos/timvermaercke/GITHUB_ROJECT/actions/workflows/main.yml/dispatches',
    {
      method: 'POST',
      body: JSON.stringify({
        ref: 'main',
      }),
      headers: {
        Authorization: 'Bearer YOUR_GITHUB_AUTH_TOKEN',
      },
    },
  );

  if (status === 204) {
    response.send({ statusCode: 200, body: 'GitHub API was called.' });
    return;
  }

  response.send({ statusCode: 400 });
  return;
});
The Access Token for GitHub can be generated here.
Now, when you deploy this function with npx firebase deploy --only functions, you'll get a URL. Calling this URL will trigger the same behavior as pushing to main, thus calling the build and deploy step. You can try this by visiting the link.
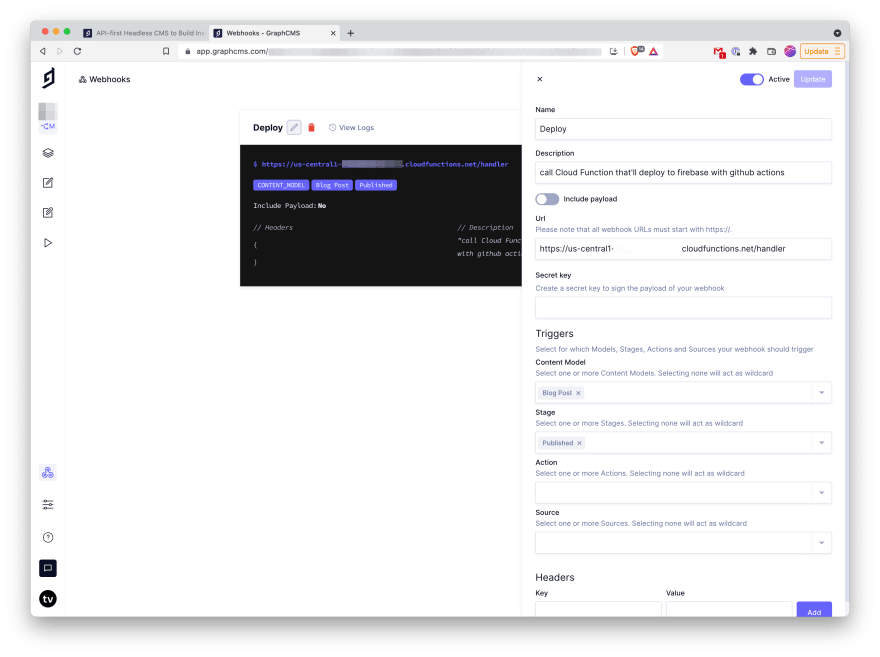
Copy that link and paste in the GraphCMS Webhooks UI.
GraphCMS allows you to configure when to call the webhook very precisely, only on certain content models, or when transitioning from certain states to others, or a combination of both.
Now create a new post and publish it.
GraphCMS will call your Firebase Cloud Function, that triggers GitHub Actions to build a new package, by pulling everything from GraphCMS, creating a build and pushing it to Firebase Hosting.
Conclusion
It takes some effort to set up this workflow, but for a static website or blog, it isn't that much of a hassle.
The editors of the blog can get access to GraphCMS and that's the only thing they should be worried about.
All the rest is taken care of by the cloud.

